Weiskopf/Morrish Course

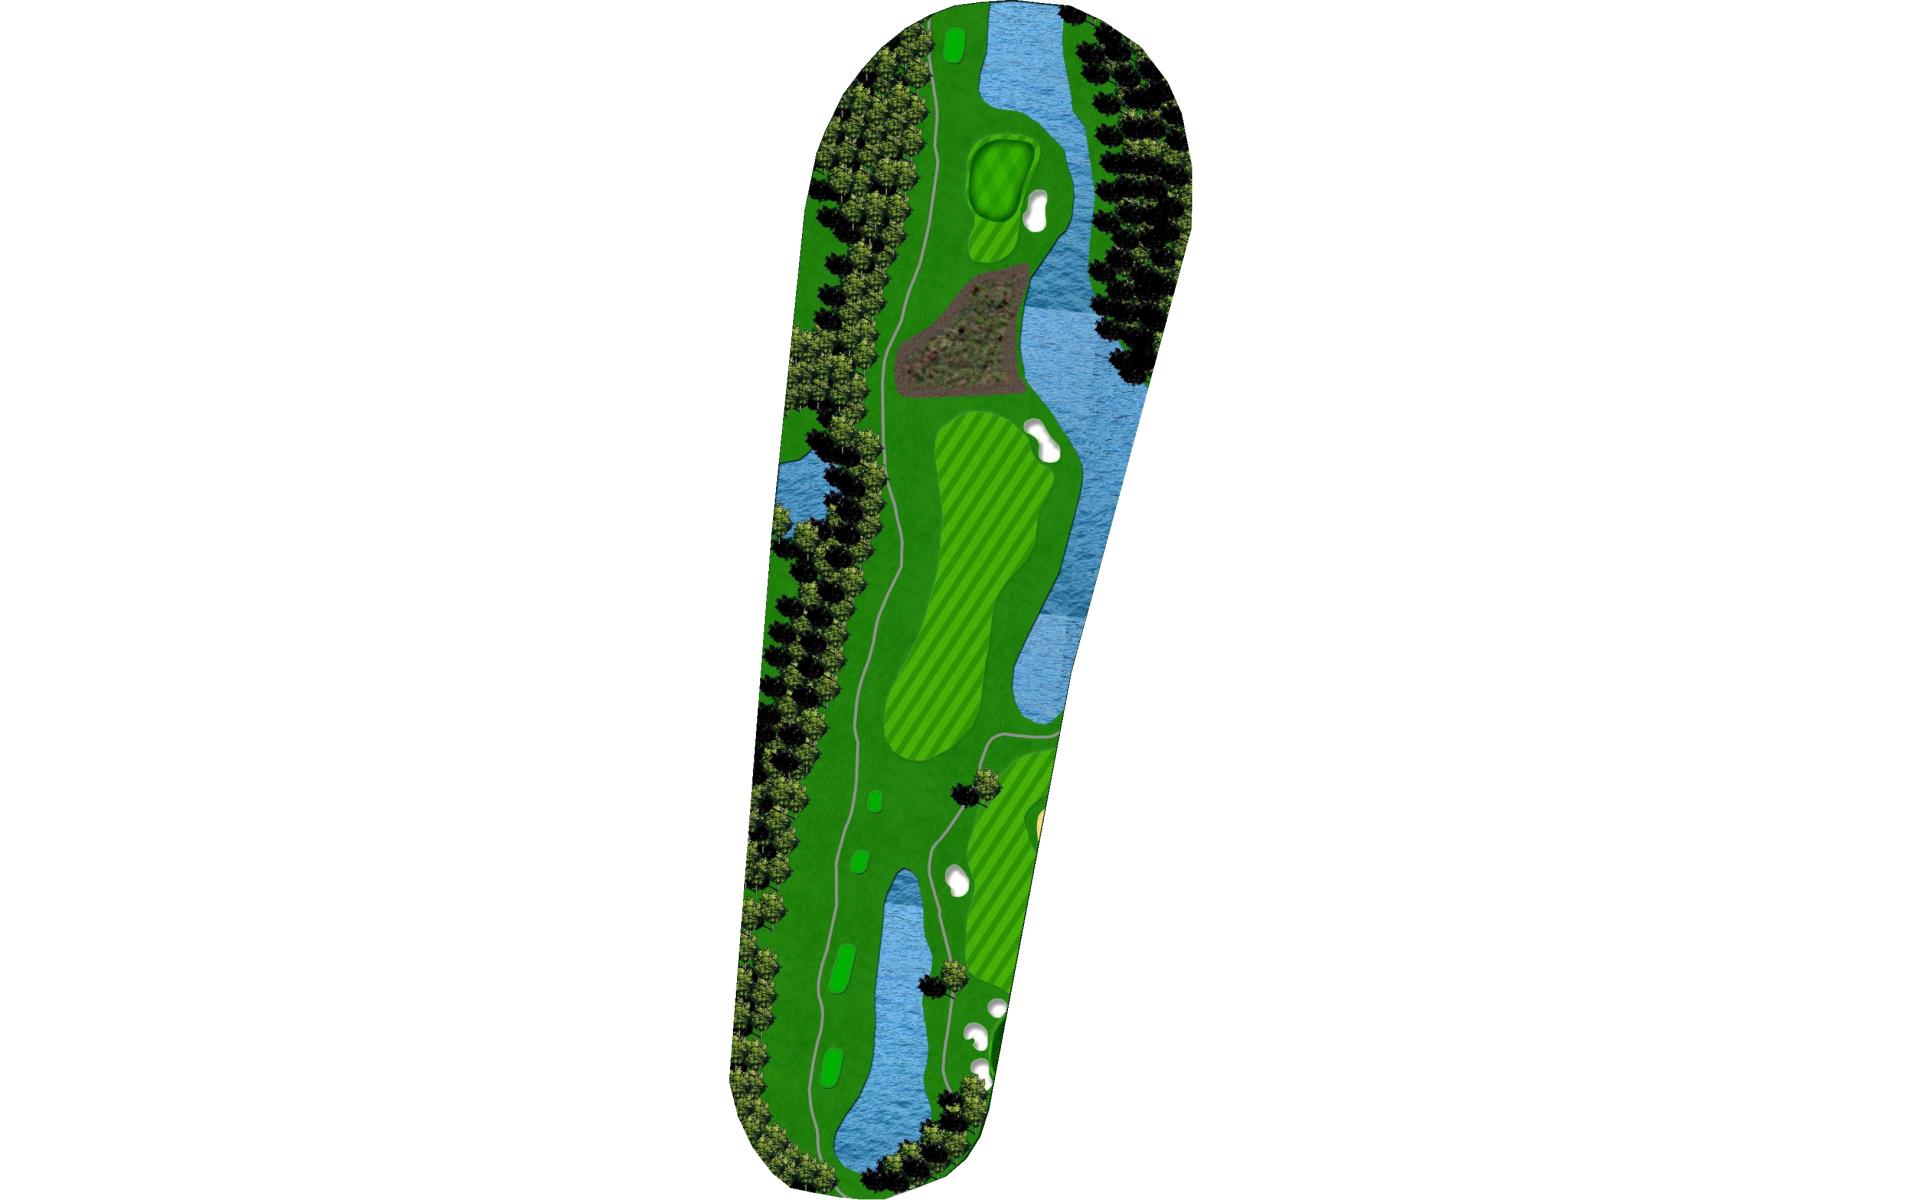
# 1 / Hole #1
Par: 5
Yardage by Tee:
Blue 542
Gold 581
Green 512
Red 498
Silver 498
Pro Tips
A very challenging starting hole, a dog leg to the left with OB on both sides. A well bunkered green will demand a precise approach shot.

# 2 / Hole #2
Par: 4
Yardage by Tee:
Blue 401
Gold 438
Green 512
Red 347
Silver 347
Pro Tips
Favor the right side off the tee on this long par 4 dog leg to the left. No bunkers in your way on this very large and challenging green.

# 3 / Hole #3
Par: 3
Yardage by Tee:
Blue 201
Gold 226
Green 512
Red 138
Silver 168
Pro Tips
A long downhill par 3 requires a well struck shot to avoid both bunkers left and right. Another large green that produces many 3 putts.

# 4 / Hole #4
Par: 4
Yardage by Tee:
Blue 404
Gold 431
Green 512
Red 292
Silver 325
Pro Tips
A scenic downhill dog leg right par 4 with a forced carry on your tee shot over a large creek. A very difficult second shot up hill to another well bunkered, spacious green.

# 5 / Hole #5
Par: 3
Yardage by Tee:
Blue 156
Gold 168
Green 512
Red 130
Silver 130
Pro Tips
A short par 3 but with bunkers front, left and right to a very narrow, yet long green. Iron accuracy is the premium on this short hole.

# 6 / Hole #6
Par: 4
Yardage by Tee:
Blue 261
Gold 312
Green 512
Red 182
Silver 216
Pro Tips
A very drive-able par 4 with a huge ravine off the tee. Avoid the monstrous green-side bunker on the front left and a birdie putt is the norm here.

# 7 / Hole #7
Par: 3
Yardage by Tee:
Blue 170
Gold 205
Green 512
Red 115
Silver 142
Pro Tips
A very challenging par 3, slightly uphill, well bunkered on left and right sides requiring a long iron shot to carry to this undulating green.

# 8 / Hole #8
Par: 5
Yardage by Tee:
Blue 488
Gold 493
Green 512
Red 428
Silver 456
Pro Tips
A reachable par five requiring a precise second shot to a well bunkered green. A plateaued fairway for second shots will open the approach angle to the green. A birdie hole for the longer players.

# 9 / Hole #9
Par: 3
Yardage by Tee:
Blue 166
Gold 201
Green 512
Red 134
Silver 134
Pro Tips
A medium length par 3 with another large green with a variety of difficult pin locations. Favor the left side and avoid the deep bunker on the right.

# 10 / Hole #10
Par: 4
Yardage by Tee:
Blue 414
Gold 441
Green 360
Red 342
Silver 354
Pro Tips
The most difficult par 4 on the course, a sharp dog leg left, par 4 with trouble left and right off the tee. A long uphill second shot requires a well struck golf shot to carry both the left and right green-side bunkers. Par is a good score on this challenging hole.

# 11 / Hole #11
Par: 4
Yardage by Tee:
Blue 425
Gold 453
Green 407
Red 331
Silver 351
Pro Tips
A difficult dog leg right, par 4 with a sloping fairway to the right. Out of bounds left and a penalty area to the right will require an accurate
tee shot. The second shot will require a full carry to the green and to avoid the front right grass bunker.

# 12 / Hole #12
Par: 4
Yardage by Tee:
Blue 400
Gold 406
Green 372
Red 295
Silver 327
Pro Tips
Another par 4 dog leg right with a generous fairway to the left side. Avoid the deep right side fairway bunkers off the tee and you will have a mid-iron to the green. Avoid the deep front-side bunker and the false front on the right side of the green.

# 13 / Hole #13
Par: 5
Yardage by Tee:
Blue 585
Gold 609
Green 553
Red 457
Silver 465
Pro Tips
Maybe the hardest hole on the course with a demanding tee shot to a plateau fairway. A lay-up second shot in front of a huge marsh must be aggressive to allow for a shorter approach to a well bunkered and narrow green. A par on this long par 5 is a great score.
# 14 / Hole #14
Par: 4
Yardage by Tee:
Blue 390
Gold 424
Green 380
Red 296
Silver 326
Pro Tips
A straight away par 4 with a wetland area 250 yards off the tee requiring long hitters to lay-up off the tee. A large lake on the entire right side of this hole comes into play. A large green with many challenging hole locations.

# 15 / Hole #15
Par: 5
Yardage by Tee:
Blue 459
Gold 469
Green 426
Red 389
Silver 400
Pro Tips
A narrow, yet short par 5 dog leg left will allow long hitters to go for the green in 2 but will need to avoid the two green-side bunkers, front and right. A smaller sloping green will challenge those birdie putts.

# 16 / Hole #16
Par: 3
Yardage by Tee:
Blue 145
Gold 168
Green 145
Red 111
Silver 111
Pro Tips
A short but difficult par 3, well bunkered with water to the left side of the green. A severely sloping green will require an accurate shot to stay below the hole. Proper club selection is key here, as overhit shots will be severely penalized over the green.

# 17 / Hole #17
Par: 4
Yardage by Tee:
Blue 399
Gold 425
Green 377
Red 332
Silver 362
Pro Tips
A very challenging par 4 dog leg left with OB left. Stay right off the tee to open your view of the green on your second shot. A huge ravine to the right of the green will ensure a double bogey for any wayward shots right. Stay below the hole on this front to back sloping green.

# 18 / Hole #18
Par: 4
Yardage by Tee:
Blue 346
Gold 401
Green 334
Red 247
Silver 334
Pro Tips
A short but difficult par 4 with OB in play to the left. Short iron seconds shots will require accuracy and distance control to navigate a huge green with a false front toward the entire left side of the green.